Build Your Own Small Bathroom Vanity with Cane Door: A Detailed Guide
By Michael Brown
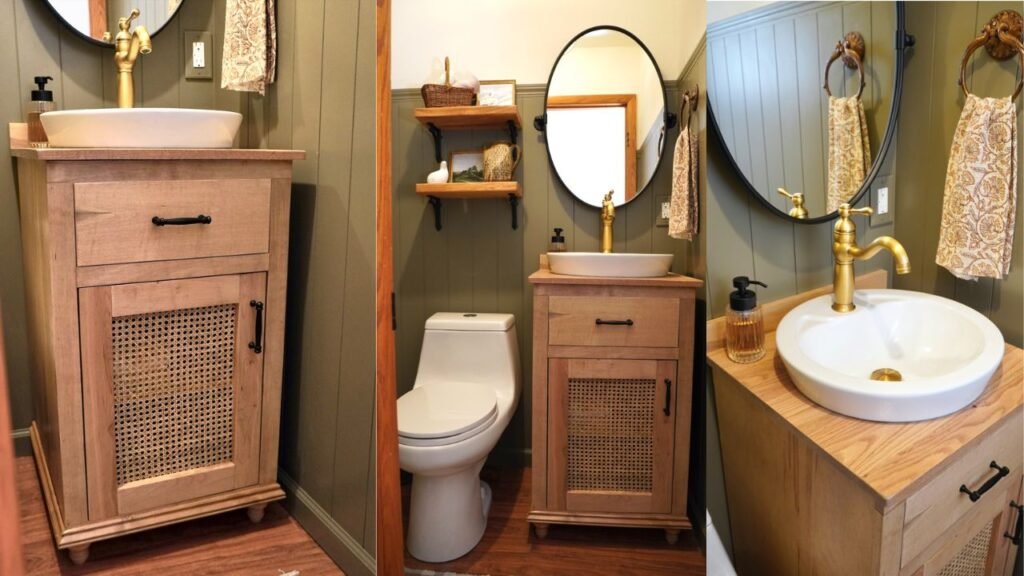
Transform your bathroom with this elegant and functional small bathroom vanity, featuring a charming cane door. This woodworking project will add a touch of sophistication and organization to your space.
Tools Required
Drill
Table Saw
Miter Saw
Jig Saw
Sander
Nail Gun
Staple Gun
Clamps
Materials List:
Wood Products:
1 – Plywood, 3/4″ Thick, 4′ x 8′ Sheet
2 – Maple Boards, 1″x4″, 8′
1- Maple Board, 1″x8″, 2′
1 – Red Oak Glue Up Board, 3/4″ Thick, 2′ x 3′
1 – Decorative Trim, 1″, 8′
4 – Wood Decorative Legs, 3″
Hardware & Supplies:
1 – Roll of Cane
2 – Handles for Faux Drawer and Door
1 – Blum Clip Top 110 Degree Face Frame, Inset Hinge
2 – 1/2″ Screws
1 – 1/4″ Screws
1 – 1/2″ Brad Nails
Wood Glue
Stain/Finish of Choice
1 – Drop-in Sink 18″
4 – Small “L” Shaped Brackets (Optional for Cabinet Shelf)
Trim Tape (Optional for Cabinet Shelf)
Staples
Silicone
Cut List & Parts:
2 – Plywood Cabinet Carcass Side Pieces: 20″ x 30.5″
1 – Plywood Cabinet Carcass Bottom: 18.5″ x 20″
2 – Plywood Cabinet Carcass Top Pieces: 18.5″ x 2.5″
2 – Base Pieces Frame: 1″x4″x20″
2 – Base Pieces Frame: 1″x4″x13″
2 – Face Frame Top and Bottom Pieces: 1.5″ x 20″
2 – Face Frame Side Pieces: 1.5″ x 28 1/4″
1 – Face Frame Middle Piece: 1.5″ x 17″
2 – Trim Pieces on Bottom (45-degree cuts on one side): 21 1/2″
1 – Trim Piece on Bottom (45-degree cuts on both sides): 21 1/2″
1 – Oak Wood Vanity Top: 21 1/2″ x 21 1/2″
1 – Faux Drawer Front: 17″ x 6″
2 – Door Stiles (Side Pieces): 2 1/2″ x 20 3/4″
2 – Door Rails (Top and Bottom Pieces): 2 1/2″ x 12″
1 – Plywood Cabinet Shelf (Optional): 18.5″x20″
1 – Wood Back Splash Piece (Optional): 2.5″ x 21 1/2″
Step-by-Step Assembly Directions:
1. Cutting cabinet carcass pieces:
Cut 2 pieces of plywood 30.5″ x 20″ (Side Pieces).
Cut 1 piece of plywood 18.5″ x 20″ (Bottom Piece).
Cut 2 pieces of plywood 18.5″ x 2.5″ (Top Pieces).
2. Building cabinet carcass:
Drill 5 pocket holes on each of the 20″ sides of the bottom piece.
Use pocket holes with pocket hole screws and wood glue to attach the side pieces to the bottom piece.
Drill 2 pocket holes on each end of the top pieces.
3. Building base:
From 1×4 lumber, cut 2 pieces at 20″ and 2 pieces at 13″.
Drill 2 pocket holes on each end of the 13″ pieces.
Assemble the frame using pocket holes with pocket hole screws and glue.
Attach the 4 decorative legs to the base using 2 1/2″ screws.
Attach the base to the cabinet carcass using 1 1/4″ screws, ensuring the legs are visible.
Tip: Position the front legs slightly inward from the base so they don’t get covered up after adding trim pieces.
4. Cutting face framing pieces:
Use a table saw to rip 1×4 lumber into 1 1/2″ wide pieces for the face frame.
Take these 1 1/2″ wide pieces and use a miter saw to cut the face framing components:
2 pieces at 20″
2 pieces at 28 1/4″
1 piece at 17″
5. Adding face framing pieces:
Use a nail gun to attach the face framing pieces to the outer edge of the cabinet carcass.
6. Adding middle trim piece:
Drill one pocket hole on each end of the 17″ long face frame middle piece.
Measure 7 1/2″ down from the top and use pocket holes with pocket hole screws and wood glue to attach this piece to the side face framing pieces.
7. Adding decorative trim:
Use a miter saw to cut 1 piece of trim at 21 1/2″ with a 45-degree angle cut on both sides.
Use a miter saw to cut 2 pieces of trim at 21 1/2″ with a 45-degree cut on one side and a straight cut on the other. Attach these around the bottom of the vanity.
8. Cutting and attaching vanity top:
Cut the oak board down to 21 1/2″ x 22 1/4″.
Drill a starting hole in the top.
Use that drilled hole with a jigsaw to cut out the opening for the drop-in sink.
Attach the top using 1 1/4″ screws from the inside of the cabinet carcass.
9. Attaching faux drawer front:
Use wood glue and brad nails to attach a scrap piece of plywood to the side trim pieces on the inside of the cabinet (this acts as a nailer).
Then, use this same scrap plywood piece to attach the 17″ x 6″ faux drawer front using brad nails and wood glue.
10. Building door:
Use a 1″x3″ board or rip down a wider board to 2.5″ wide.
Cut 2 pieces at 20 3/4″ (Stiles – side pieces).
Cut 2 pieces at 12″ (Rails – top and bottom pieces).
Drill two pocket holes on each end of the 12-inch rail pieces.
Use pocket holes with pocket hole screws and wood glue to assemble the door frame.
11. Staining and top coat:
Stain the vanity and door with your chosen stain.
Apply approximately 7 coats of topcoat to make it fully waterproof, especially important for a bathroom environment.
12. Attaching the door:
Use a jig to drill out cups for the concealed hinges on the door.
Use the Blum clip top 110-degree face frame, inset hinges for framed cabinets with an inset door. Mount the hinges to the door and the face frame.
13. Cabinet shelf (optional):
Cut a piece of plywood 18.5″ x 20″.
Use a jigsaw to cut out a notch to work around the “P” trap (sink plumbing).
Apply trim tape to the front edge of the shelf for a finished look (optional).
Use small “L” shaped brackets to hold the shelf up on the sides.
Tip: Using “L” shaped brackets allows the shelf to be easily removed if you need to access plumbing.
14. Finish door:
Soak a piece of cane webbing in water for 20 to 30 minutes to make it pliable.
Use a staple gun to attach the cane webbing to the inside of the door frame, pulling it taut.
Re-install the door on the cabinet.
Finish the vanity by adding a handle to the door and the faux drawer front.
Tip: Add the handle to the faux drawer front before getting the sink installed and siliconed down.
15. Final step (optional backsplash):
Add a 2.5″ x 21 1/2″ wood piece behind the sink against the wall as a backsplash.
Use silicone to attach this piece to the countertop and the wall.
Enjoy your new, handcrafted small bathroom vanity!